Are you looking for a clear guide on How to change the width of blog on WordPress? Customizing the width of your blog on WordPress is a great way to enhance its design and improve user experience. Whether you’re using a pre-built theme or working with custom CSS, knowing how to change the width of a blog on WordPress can help you create a layout that perfectly fits your content and style. In this article, we’ll show you step-by-step how to change the width of a blog on WordPress, making it easier than ever to achieve the look and feel you want for your website.
Contents
1. How to change the width of blog on WordPress using a Plugin
1. Understanding Width-Specific Plugins
Adjusting the width of your blog in WordPress is straightforward when using specialized plugins. Depending on whether you want a wider or narrower layout, specific plugins or theme options can help you achieve your desired look. Here’s a step-by-step explanation of how to use plugins for this purpose and some recommendations for wider theme plugins.
Plugins designed for layout adjustments allow you to control the width of your blog without requiring coding knowledge. Some plugins focus on creating wider layouts, while others help you achieve narrower designs.
If you want to create a wider layout, using a plugin compatible with a wide theme is essential. These plugins work best with themes designed to support flexible or extended layouts. Once the theme and plugin are installed, you can further tweak the width using other methods like the WordPress Customizer or custom CSS for additional precision.
2. How to Use a Wide Theme Plugin
To increase the width of your blog, follow these steps:
- Step 1: Install a Wide Theme Plugin Choose a plugin that supports wider layouts. For example:
- Elementor: A powerful page builder plugin that allows custom layouts and width adjustments.
- WP Page Builder: Offers drag-and-drop features with customizable content area sizes.
- GeneratePress: A lightweight theme plugin with advanced layout controls for wider blogs.
- Step 2: Select a Wide-Supporting Theme
Install a theme that complements your plugin’s capabilities. Some popular wide layout themes include:- Astra: Known for its flexibility and wide layout options.
- OceanWP: Supports full-width designs and offers extensive customization.
- Neve: Lightweight and highly customizable, perfect for blogs requiring wider layouts.
2. Using WordPress Customizer – How to change the width of blog on WordPress
The WordPress Customizer is a built-in tool that makes it simple to adjust your blog’s layout, including its width, without needing any coding knowledge. By following these steps, you can quickly learn How to change the width of blog on WordPress and create a layout that suits your needs.
- Log in to Your WordPress Dashboard
- Navigate to your website’s WordPress admin area by entering your login credentials.
- Access the Customizer
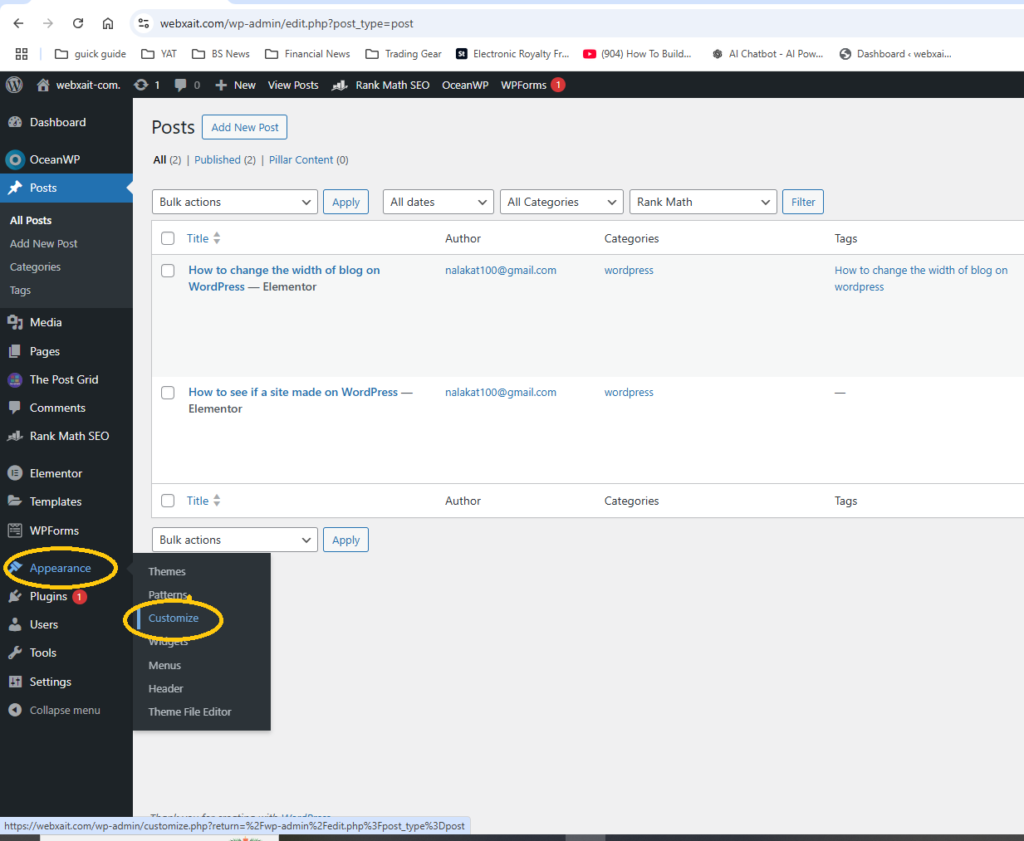
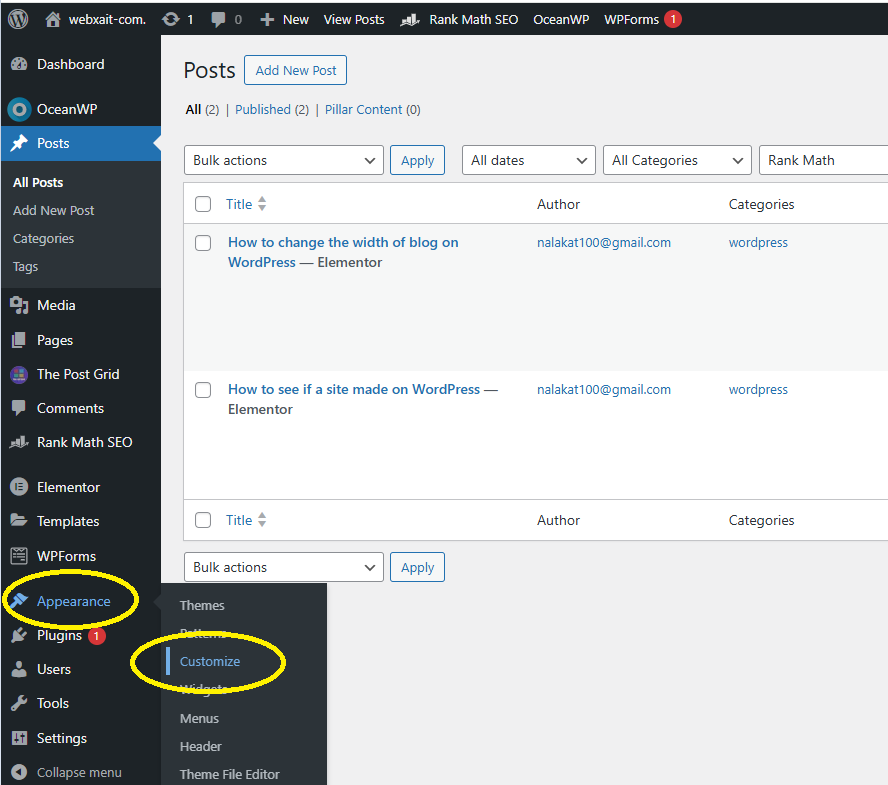
- From the dashboard, go to Appearance > Customize. This opens the WordPress Customizer, where you can make real-time changes to your website.
- Locate the Layout Settings
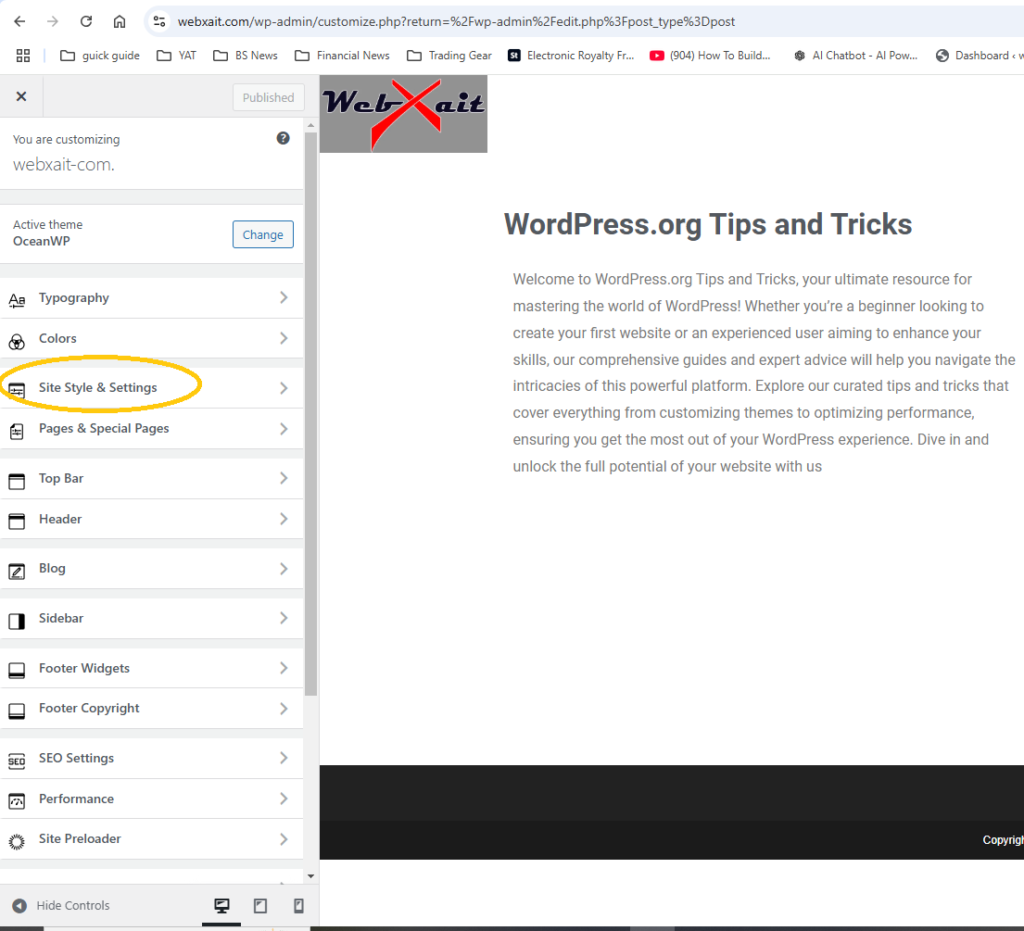
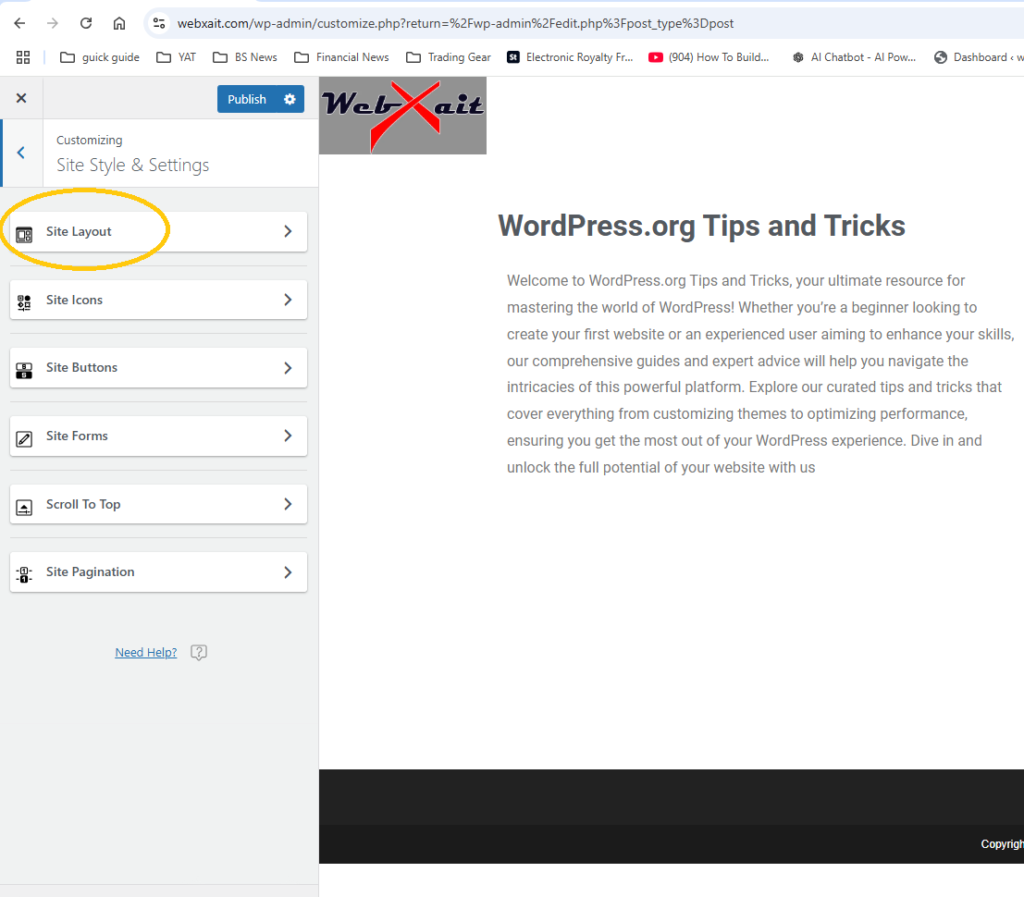
- In the Customizer, look for options labeled Layout, Container, or Blog Settings. These settings vary depending on the theme you are using.
- Click on the relevant section to access width-related options.
- Adjust the Blog Width
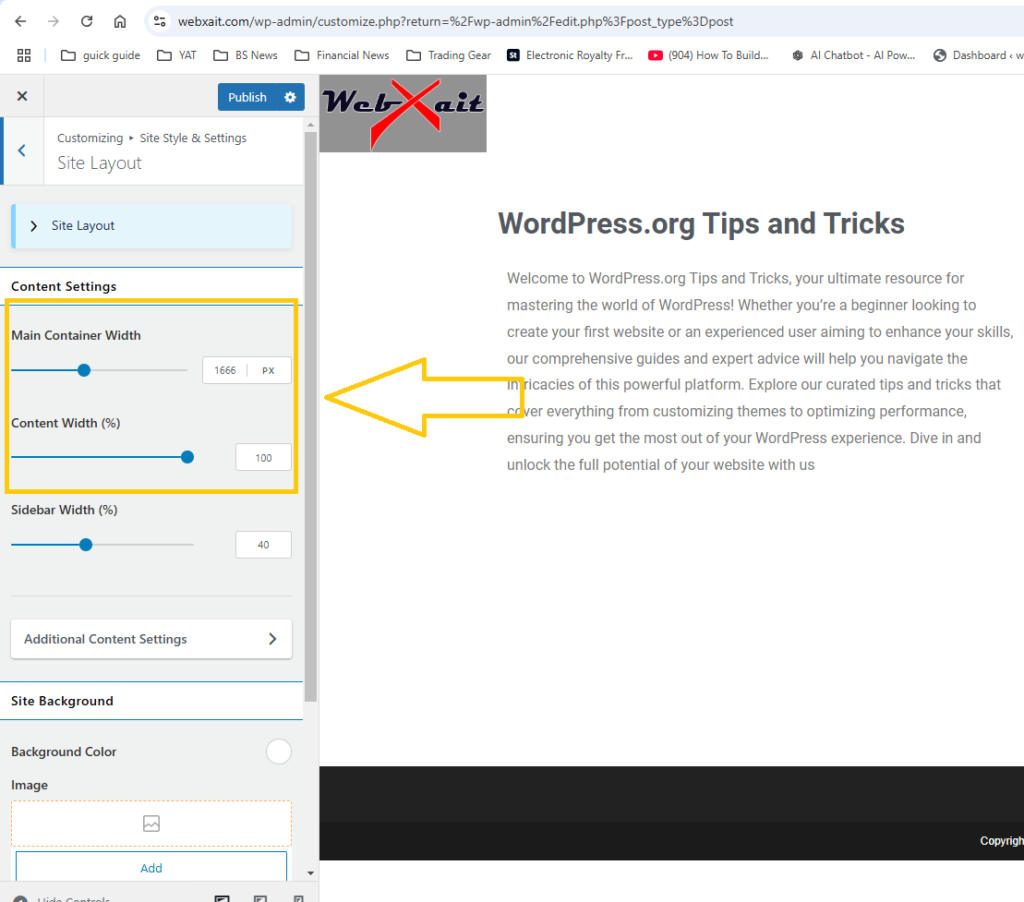
- If your theme supports it, you’ll see sliders or fields to adjust the width of your blog content area.
- Increase or decrease the width based on your preference and watch the live preview update.
- Save Changes
- Once you are satisfied with the new blog width, click the Publish button to save your changes.
Additional Tips:
- Ensure Theme Compatibility: Not all WordPress themes support width adjustments in the Customizer. For better control, use themes like Astra, OceanWP, or Neve, which include flexible layout options.
- Preview on Multiple Devices: Check how the new width looks on mobile, tablet, and desktop to ensure a responsive design.
Pls follow Screen shout below for your easy reference
3. Using Custom CSS – How to change the width of blog on WordPress
- Log in to your WordPress Dashboard
- Go to
yourdomain.com/wp-adminand log in.
- Go to
Navigate to the Customizer
- Go to Appearance > Customize.
Add Custom CSS
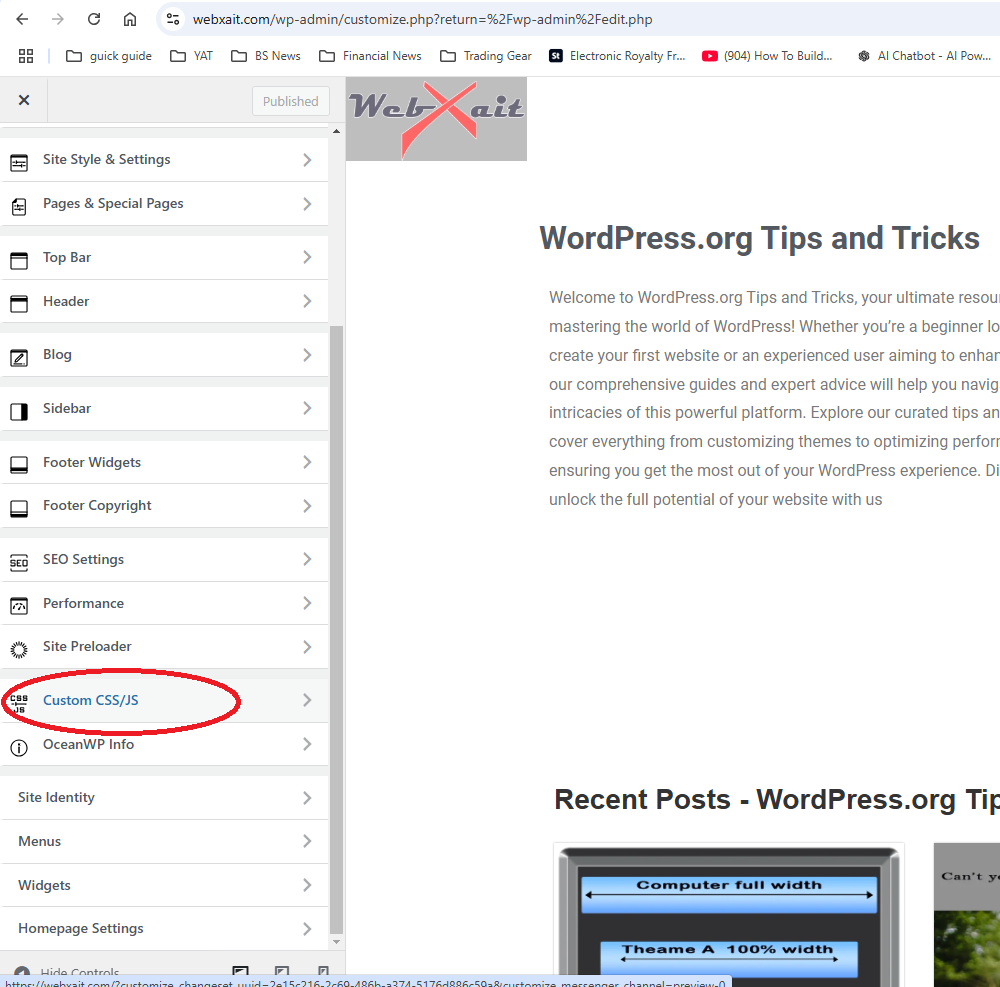
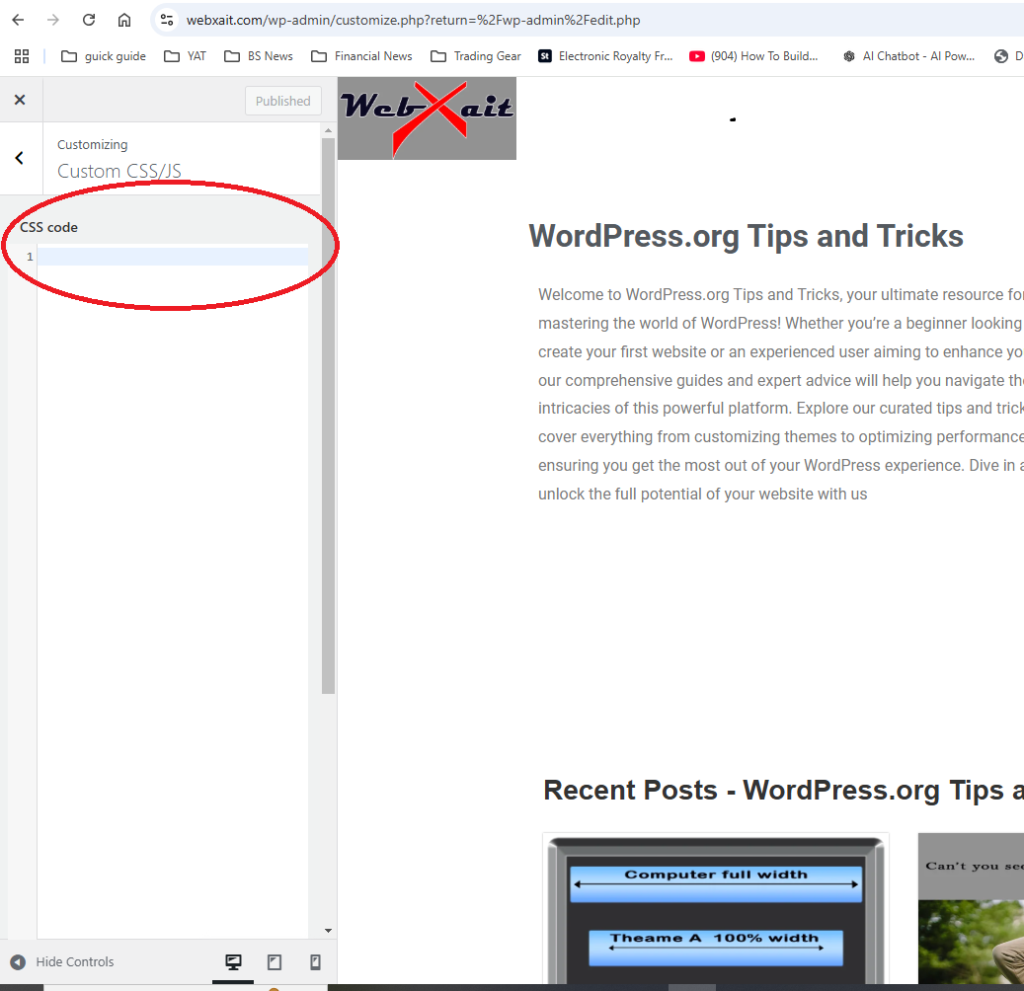
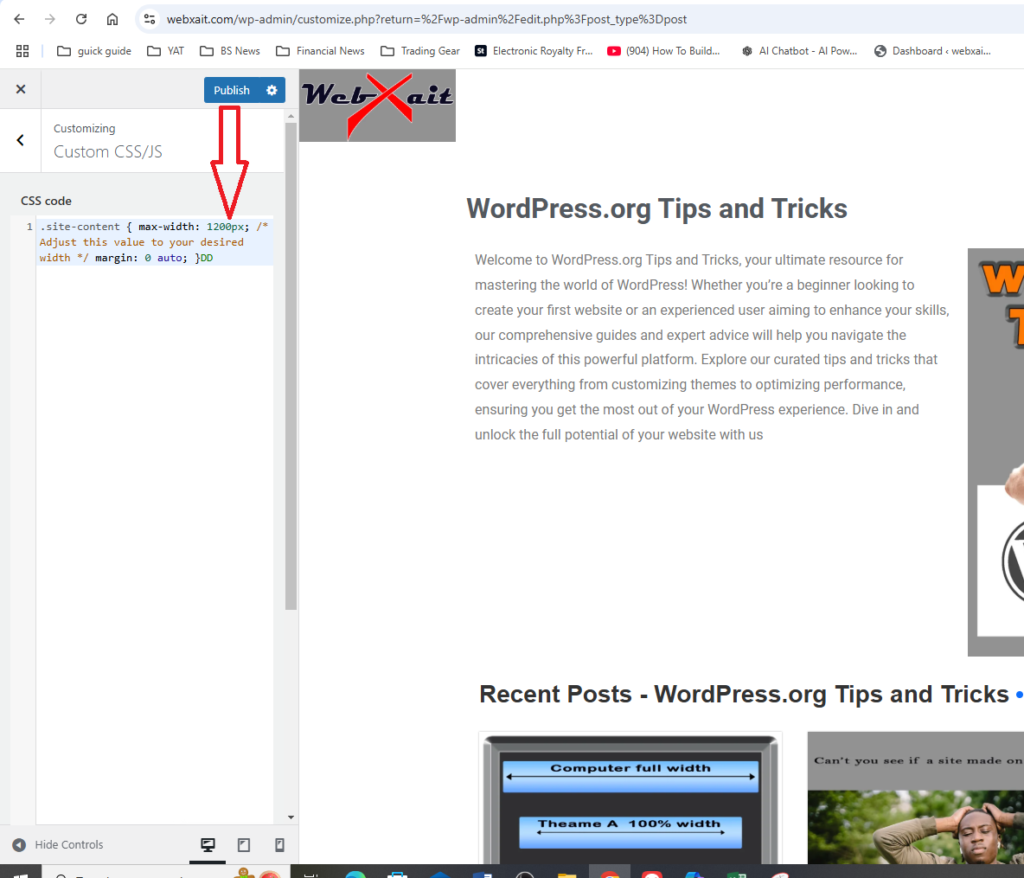
- In the Customizer, click on Additional CSS.
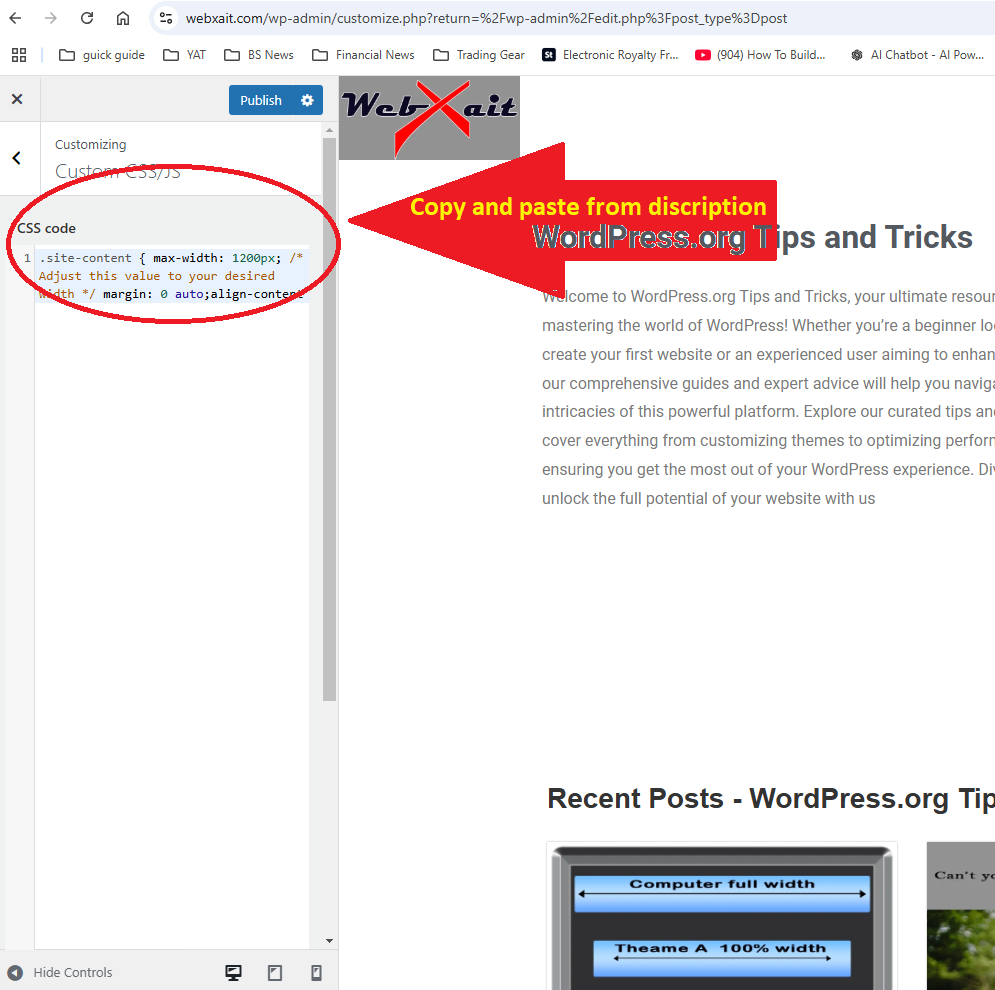
- In the text box, add the following CSS code to adjust the width of the blog content:
.site-content {
    max-width: 1200px; /* Adjust this value to your desired width */
    margin: 0 auto;
}- Replace
1200pxwith the width you want (you can usepxfor pixels or%for a percentage of the screen size). How to change the width of blog on WordPress
Save Your Changes
- After adding the CSS, click Publish to apply the changes.
4 .How to change the width of blog on WordPress Using a Page Builder Plugin (Elementor , WPbakery)
Page builder plugins like Elementor and WPBakery provide an easy and flexible way to customize your blog’s layout, including its width, without any coding. These tools allow you to design your blog visually, offering precise control over content areas. Here’s how to use these plugins to learn How to change the width of blog on WordPress.
Steps to Change Blog Width Using Elementor or WPBakery
- Install and Activate the Page Builder Plugin
- Go to your WordPress dashboard and navigate to Plugins > Add New.
- Search for Elementor or WPBakery Page Builder, then click Install and Activate.
- Edit Your Blog Page with the Page Builder
- Open the page or post you want to edit and click Edit with Elementor (or Edit with WPBakery, depending on your plugin). This will open the page builder interface.
- Adjust the Content Width
- For Elementor:
- Click the Settings Icon (bottom left corner) and select Page Layout.
- Choose Elementor Full Width or Canvas to enable wider layouts.
- Use the column width handles to expand or shrink individual content areas.
- For WPBakery:
- Add a row or column layout from the WPBakery editor.
- Access Row Settings, where you can adjust the width by enabling the Full-Width Row option or setting a custom width.
- For Elementor:
- Preview and Adjust
- Use the live preview feature to check how the new width looks on different devices.
- Make any necessary adjustments to ensure a balanced and responsive layout.
- Save and Publish Your Changes
- Once satisfied with your blog’s new width, click Update or Publish to save your changes.
Why Use a Page Builder Plugin?
- Elementor and WPBakery offer drag-and-drop interfaces, making it easy to customize layouts without technical skills.
- These plugins provide advanced control over width, spacing, and alignment, ensuring your blog looks professional and visually appealing.
By following these steps, you can easily learn how to change the width of a blog on WordPress using Elementor or WPBakery, creating a tailored design that enhances readability and user experience.
Conclusion -How to change the width of blog on WordPress
In conclusion, learning how to change the width of a blog on WordPress is a simple yet impactful way to customize your website and improve its overall appearance. By following the steps outlined in this guide, you can easily adjust the blog width through your theme settings, plugins, or custom CSS. Whether you’re a beginner or an experienced WordPress user, understanding how to change the width of a blog on WordPress allows you to create a layout that suits your content and enhances user engagement. Start exploring your options today and see how mastering how to change the width of a blog on WordPress can transform your website into a more polished and professional platform!
We find most beginners of WordPress struggle on very basic alteration like How to change color for text in WordPress, How to see if a site was made on WordPress and many more . In addition to How to change the width of blog on WordPress we are introducing basic learning material in Webxait.com for absolute beginners .
Each method offers its own unique benefits, allowing you to create a blog that aligns with your design goals and engages your audience. Choose the approach that best suits your needs, and take your blog’s aesthetics and functionality to the next level!


Pingback: How To Change Color For Text In WordPress
Pingback: How To Find The Best WordPress Plugins Out Thousands In The List - 2024